Deploying Azure Cloud Services (extended support)
- Automatic packaging
- Packaging from script
- Configuring deployment
- Creating an Azure Service Principal
- Cloud Service Deploy Parametrization
Important: In addition to Cloud Service package (.cspkg) and Cloud Service configuration (.cscfg) artifacts Azure Cloud Service (extended support) provider also requires Cloud Service definition (.csdef) to be uploaded to artifacts.
Automatic packaging
To build Azure CS project and automatically push its artifacts enable Publish Azure Cloud Service projects option on Build tab of project settings.
To enable packaging of Azure CS projects in appveyor.yml:
build:
  publish_azure: true
AppVeyor will find Azure Cloud Service project (.ccproj), build and package it. Created Cloud Service package (<project-name>.cspkg), service definition (<project-name>.csdef) and default “Cloud” configuration (<project-name>.cscfg) will be published to build artifacts. In addition to that all .cscfg files found in Cloud Service project folder are pushed to artifacts with names <project-name>.<config>.cscfg.
Packaging from script
To build Azure Cloud Service package from the script you can use the following command:
msbuild <azure-cs-project>.ccproj /t:Publish /p:PublishDir=%APPVEYOR_BUILD_FOLDER% /p:TargetProfile=<config>
To push package and configuration to artifacts:
appveyor PushArtifact <azure-cs-project>.cspkg
appveyor PushArtifact <azure-cs-project>.csdef
appveyor PushArtifact ServiceConfiguration.<config>.cscfg -FileName <azure-cs-project>.cscfg
Replace <azure-cs-project> with the name of your Azure CS project and <config> with the name of target configuration, e.g. Cloud, Local.
Configuring deployment
Sample appveyor.yml configuration:
deploy:
  provider: AzureCSExtended

  # Azure account details

  client_id: <app-id-guid> # Application (client) ID
  client_secret:
    secure: <app-secret-encrypted>
  tenant_id: <tenant-id-guid> # Directory (tenant) ID
  subscription_id: <subscription-id-guid>
  resource_group: <resource-group-name>

  # Cloud Service details

  service: <cloud-service-name-in-azure>
  artifact: <cloud-service-project-name>
  target_profile: Cloud   # optional .cscfg configuration name to deploy with
  deployment_label: $(APPVEYOR_BUILD_VERSION)
  do_not_start_deployment: false

  # Deployment storage - temp storage for cloud service package

  storage_account_name: <storage-name>
  storage_access_key:
    secure: <account-access-key>
  storage_container_name: deployments # optional

  # Networking settings

  load_balancer: <load-balancer-name>
  public_ip: <ip-address-resource-name>

  # SSL certificate

  key_vault: <key-vault-resource-name>
  certificate_url: https://{vault-name}.vault.azure.net/secrets/{number}/{number}

  # RDP (optional)

  rdp_username: admin
  rdp_password:
    secure: <encrypted password>
  rdp_expiration: 180 # days

  # WAD diagnostics (optional)

  diagnostics_config: |
    <PublicConfig xmlns="http://schemas.microsoft.com/ServiceHosting/2010/10/DiagnosticsConfiguration">
      <WadCfg>
        ...
      </WadCfg>
    </PublicConfig>
  diagnostics_account_name: <storage-account-name-for-WAD-data>
  diagnostics_account_key:
    secure: <encrypted-storage-account-access-key>
To get subscription_id of your Azure subscription navigate to Subscriptions blade in Azure Portal.
Creating an Azure Service Principal
Azure Cloud Service (extended support) provider requires Azure Service Principal to access Azure Resource Manager (ARM) API.
You can find a lot of Microsoft and 3rd-party guides for creating Azure service principals, but here’s a short version of it.
To create a new service principal:
- Login to Azure Portal.
- Navigate to Microsoft Entra ID.
- Click App registrations on the left navigation menu.
- Click New registration.
- Provide application name and click Register button.
- Overview app page contains Application (client) ID and Directory (tenant) ID.
- Click Certificates & secrets on the left app menu and then Client secrets.
- Click New client secret and specify secret name. Copy secret’s Value.
- Go to Access control (IAM) of cloud service resource group and assign Contributor role to the created service principal.
Cloud Service Deploy Parametrization
When deploying Cloud Services to different environments you don’t want to re-build application package every time with different configurations, but you want to deploy the same package (artifact) with some environment-specific settings configured during deployment. When using Cloud Service Deploy the problem can be easily solved by Cloud Service Deploy parametrization.
Setting parameters during deployment
Cloud Service Deploy provider analyzes the deployment package and looks into environment variables to set parameter values with matching names.
Variable should be in format <role_name>.<setting_name>. For example if your .cscfg contains the following:
<Role name="FrontEnd">
  <Instances count="3" />
  <ConfigurationSettings>
    <Setting name="ConnectionString" value="" />
  </ConfigurationSettings>
</Role>
Environment variable name should be FrontEnd.ConnectionString.
When promoting specific build from Environment page you set variables on environment settings page:
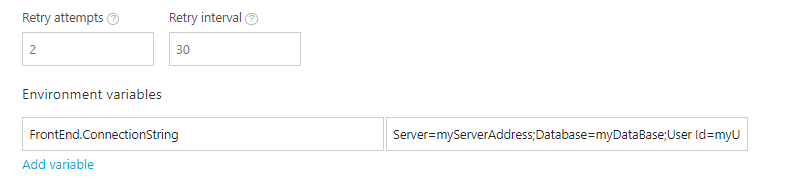
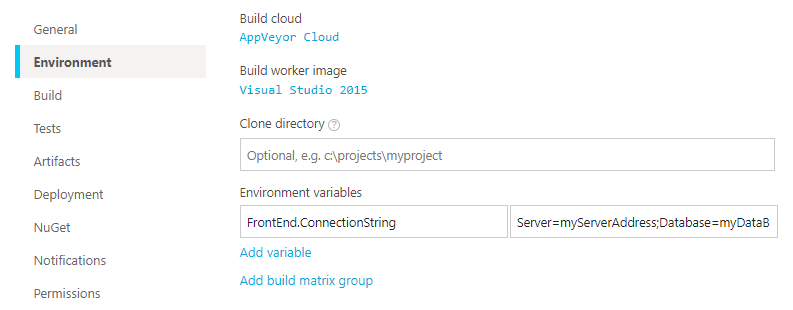
When deploying during the build session environment variables are used instead. You can set build environment variables on Environment tab of project settings, appveyor.yml or programmatically during the build.
Variables defined during the build override those ones defined on Environment level.
Deployment Upgrade Mode
AppVeyor exposes DeploymentUpgradeMode Enumeration with “tweak” environment variable called APPVEYOR_ACS_DEPLOYMENT_UPGRADE_MODE. Default value is Auto. Set it to Manual or Simultaneous if different behavior is required.